Living in a house with mould is bad for your health. Living in a house with mould stains - where you’ve cleaned the mould, but it’s left really annoying black marks behind, is also irritating, not to mention embarrassing. The tenant(s) who lived in The Lodge before we did must have had cast iron lungs. And no shame.
Corners of the Lodge were covered with black mould (including a small amount of the really toxic variety) and stains, and I started wheezing on the survey day after spending more than an hour inside without a mask.
So although stripping the wallpaper is high on the to-do list, killing the mould spores before we managed to shake them into the atmosphere was a number one priority, and one we wanted done sharpish. Plus, getting rid of evidence of mould before the mortgage valuation seemed like a sensible thing to do.
Enter my new favourite product: HG Mould Spray.
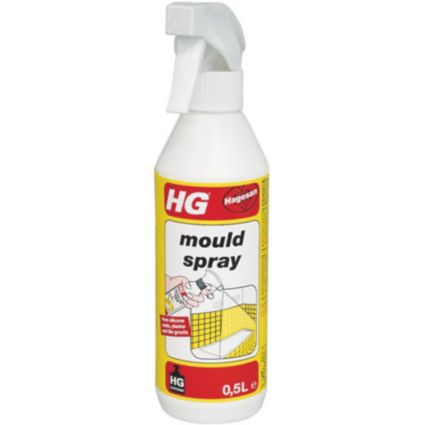 I'd found this after searching the internet for recommendations when a previous home had condensation problems, and from that search it appears I’m not alone in thinking it’s a bit awesome.
The spray not only kills mould, it also obliterates the stains that mould so often irritatingly leaves behind, handy when a mortgage survey is due to take place! You can buy it online or from various DIY-type shops – we got ours from our local B&Q for a fiver.
To apply, I squirted a liberal dose on all the mouldy areas in the Lodge (there were a lot), threw open all the windows, and went outside to partake in some fresh air.
 |
| Before... |
After half an hour I headed back inside and wiped the walls down. I found that on purely painted surfaces every single trace of mould and stain completely disappeared.
On the wallpapered surfaces some minor marks were left behind. I could have treated these a second time, but as we're removing the wallpaper, there wasn't much point - the mould itself is gone and I'm happy with that.
 |
| ...After |
This recommendation comes with a warning though – this is one of those products where you should pay serious attention to the label. When it says don’t get it on metal, it means it – the first time I used it I was wearing a silver ring while spraying it, and the spray started eating it away. Wear old clothes too – I also managed to get a bleach mark on the top I was wearing. (I am known for being clumsy!)
I also strongly recommend wearing a mask and opening windows, it’s not exactly lung-friendly stuff.
We now officially own The Lodge!
After the period house survey took place and we were happy with what we were taking on, the final hurdle in our eyes was the mortgage valuation survey, which took place pretty quickly after the mortgage details were agreed and six agonising days later our mortgage lenders called to say that they were happy!

The survey had highlighted only that there was ‘localised higher than desirable damp’, so recommended a damp and timber survey. And the lenders are happy to leave that up to us, provided we do it, and then address whatever issues are raised within six months. And they don’t need us to send the actual report in, though our period house surveyor has offered to do one for us, as he'd highlighted the problems to us in the first place.
Here's the initial hygrometer reading in The Lodge, coming in at a humid 75%, highlighting the immediate challenge we face.
For more on hygrometers and humidity, check out our earlier post here.
The humidity in The Lodge, and the resulting condensation, is currently an issue. Internal corners of external walls are black with mould:
|
| Healthy... |
This humidity is caused mainly by the use of modern non-breathable materials in an old house that wasn’t designed to be airtight, and that is made of materials that work by absorbing and then expelling moisture, often referred to as ‘breathing’.
Rubber underlay appears to be the main culprit in The Lodge's case, along with a host of secondary offenders: where foil-backed ‘damp-proof’ wallpaper has been used; some areas where the original lime plaster has been replaced/repaired with gypsum plaster; at least one area where this new gypsum plaster has been given some kind of damp proof backing; UPVC double-glazed windows, complete with Sellotape over the vents; and an area of concrete flooring. Our primary objective as soon as we get the keys will be to ventilate the house – throw open all the windows and get rid of that rubber underlay, not to mention the manky carpet!
Something that Pete, our surveyor, recommended was to get a hygrometer – an instrument to measure the relative humidity of the atmosphere in The Lodge.
Mortgage and damp surveyors in particular commonly measure ‘damp’ in buildings using an electrical conductance moisture meter. These are recognisable by their two prongs, and were designed to measure the level of moisture in timber. This means that when used on other materials, such as plaster, they can only register the existence of surface moisture, and can’t determine the moisture content beyond the surface, i.e. in the wall itself.
A hygrometer on the other hand measures the water vapour in the atmosphere, usually caused by condensation and evaporation.
My parents had popped over during the survey day to have a look at the house, and my dad happened to have a hygrometer in his pocket, as you do. The Lodge registered around 75% relative humidity – something that didn’t come as a massive surprise given the amount of condensation-related mould around the house. Dad also produced an electrical conductance moisture meter and checked a joist in the floor upstairs. It registered ‘dry as a bone’. It’ll be interesting to see what the mortgage valuation surveyors report.
Meanwhile we’ve bought a hygrometer of our own, and will use it to keep an eye on our progress. I wanted a simple, non-digital version, so I read a slew of reviews online and decided to stump up £15 for a German-made (by TFA-Dostmann) version. There are various different types of hygrometer, but the one we've bought is a mechanical version. This type is based on one of the first hygrometers ever designed, back in 1783 by Horace Bénédict de Saussure. It uses a synthetic hair (the original versions would have used organic hair) that expands and contracts in reaction to the humidity in its surrounding environment. The hair is held under tension by a spring, and this spring is linked to the needle gauge that you see.
Bumps can disrupt the measurement, so as it arrived by post, the first thing we did was ‘reset’ it by wrapping it in a wet towel and leaving it for half an hour. At this point the hygrometer measures 100% humidity and is ‘reset’. To use it you simply put it in a normal room, away from direct light and heat sources, and let it acclimatise.
 |
| Hygrometer |
Here is our hygrometer in our current, run-of-the-mill, cavity walled 1950s semi, showing an ideal humidity level of around 50%:
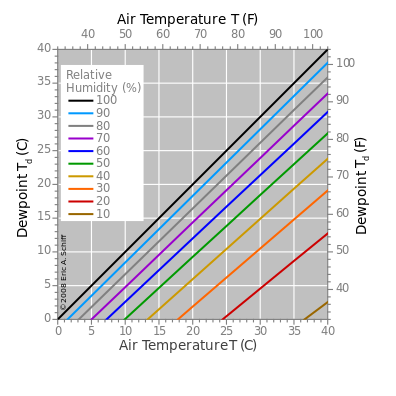
I suspect I might get a bit obsessed checking our hygrometer in The Lodge, as we try to beat the problems we're inheriting. Condensation appears on walls when the temperature of the walls is at or below the dew point – the temperature that water vapour in the air condenses into liquid water. As this is directly affected by the humidity of the atmosphere, along with reducing the humidity, warming up The Lodge itself will be another thing high on the to-do list.
The Wikipedia entry on dew point has a handy graph to show dew point calculation:
If graphs and calculations aren't your thing, you can also buy digital hygrometers with a dew point indicator built in, like this one: TFA-Dostmann Digital Hygrometer with dew point indicator.
Meanwhile, if you’re keen to read even more about condensation, here’s an article by Pete, about condensation in old buildings.
And if you just want to get rid of mould, click here for our recommendation.